OpenCV in Python
OpenCV Image Processing in Python
Python OpenCV
Python3
- Python for Windows:
Download Python3.11.7
- Ubuntu 22.04 LTS
Install OpenCV
cd ~
pip3 install numpy pandas
pip3 install matplotlib pillow imutils
pip3 install opencv-python
pip3 install opencv-contrib-python
git clone https://github.com/rkuo2000/cv2
cd cv2
Python Programming
Please self-study it !
OpenCV Image Processing
read JPEG
python3 jpg_read.jpg
~/cv2/jpg_read.py
import cv2
import sys

if len(sys.argv)>1:
    filename = sys.argv[1]
else:
    filename = 'test.jpg'

img = cv2.imread(filename)

print(type(img))

print(img.shape)

cv2.imshow('Image',img)

cv2.waitKey(0)
cv2.DestroyAllWindows()
open Camera
python3 cam.py
~/cv2/cam.py
import cv2
import sys
if len(sys.argv) >1:
    vid = int(sys.argv[1])
else:
    vid = 0
cap = cv2.VideoCapture(vid)
#cap.set(cv2.CAP_PROP_FRAME_WIDTH,1280);
#cap.set(cv2.CAP_PROP_FRAME_HEIGHT,720);

while(cap.isOpened()):
    ret, frame = cap.read()
    print(frame.shape)
    #frame = cv2.flip(frame, 1) # 0: vertical flip, 1: horizontal flip

    cv2.imshow('Camera', frame)
    if cv2.waitKey(10) & 0xFF == ord('q'):
        break
cap.release()
cv2.destroyAllWindows()
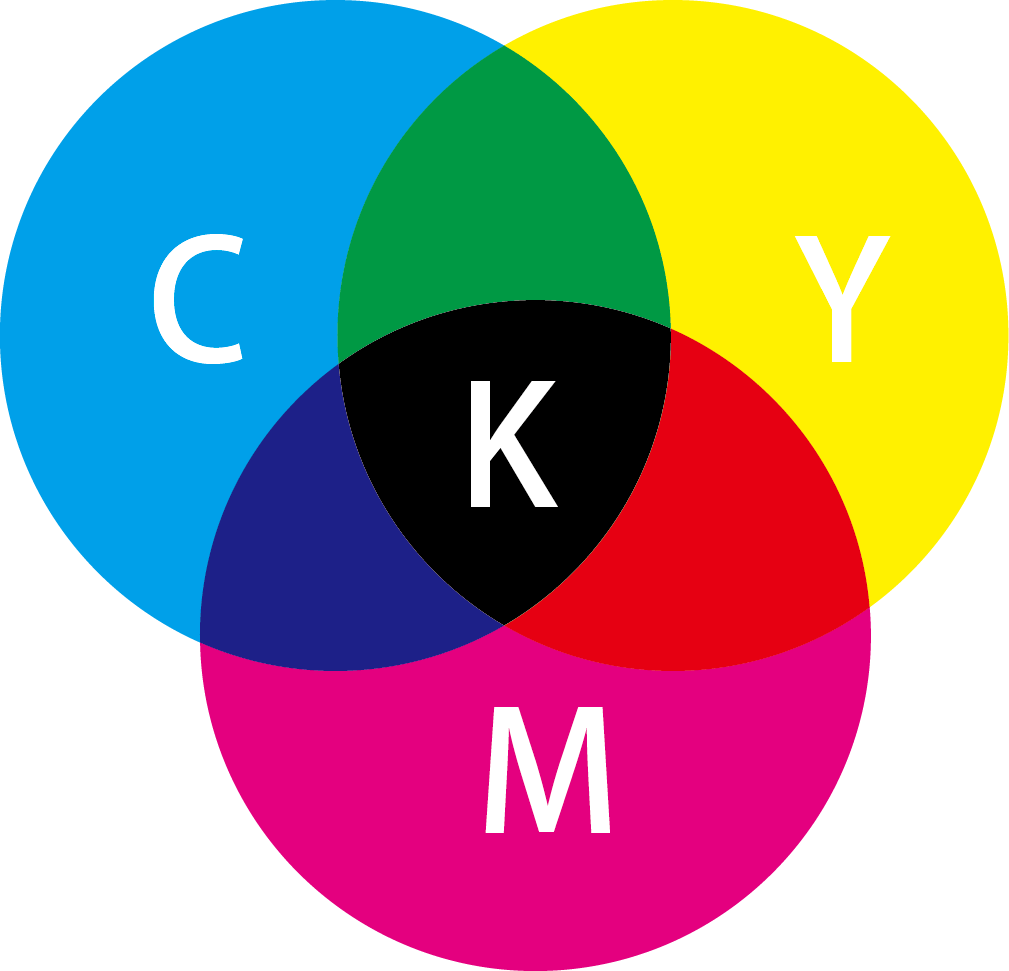
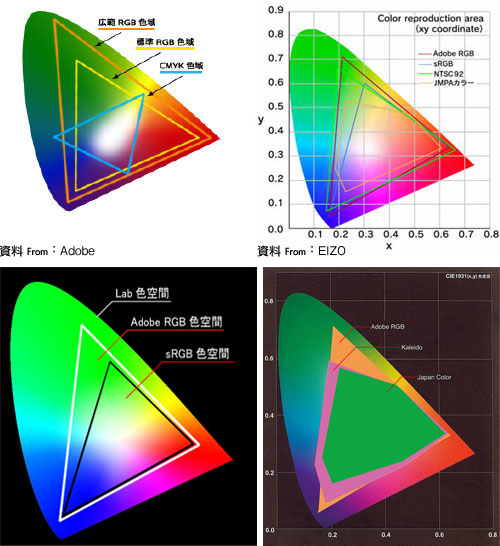
Color system: RGB, CMYK
 |
 |
-
Munsell color system hue (basic color), chroma (color intensity), and value (lightness)

 |
 |
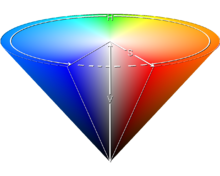
- HSL and HSV
Hue, Saturation, Lightness and Hue色調, Saturation 飽和度, Value亮度
 HSV色輪允許用戶快速的選擇眾多顏色
 HSV模型的圓錐表示適合於在一個單一物體中展示整個HSV色彩空間
OpenCV color conversion
import cv2

img = cv2.imread('test.jpg')
gray= cv2.cvtColor(img, cv2.COLOR_BGR2GRAY)
hsv = cv2.cvtColor(img, cv2.COLOR_BGR2HSV)
org1= cv2.cvtColor(gray,cv2.COLOR_GRAY2BGR)
org2= cv2.cvtColor(hsv, cv2.COLOR_HSV2BGR)

cv2.imshow('ORG' ,img)
cv2.imshow('GRAY',gray)
cv2.imshow('HSV' ,hsv)
cv2.imshow('ORG1',org1)
cv2.imshow('ORG2',org2)

cv2.waitKey(0)
cv2.destroyAllWindows()
Object Tracking by Color
import cv2
import numpy as np

cap = cv2.VideoCapture(0)

while(1):
    # Take each frame
    _, frame = cap.read()

    # Convert BGR to HSV
    hsv = cv2.cvtColor(frame, cv2.COLOR_BGR2HSV)

    # define range of blue color in HSV
    lower_blue = np.array([110,50,50])
    upper_blue = np.array([130,255,255])

    # Threshold the HSV image to get only blue colors
    mask = cv2.inRange(hsv, lower_blue, upper_blue)

    # Bitwise-AND mask and original image
    res = cv2.bitwise_and(frame, frame, mask=mask)

    cv2.imshow('FRAME', frame)
    cv2.imshow('MASK', mask)
    cv2.imshow('RESULT', res)
    k = cv2.waitKey(5) & 0xFF
    if k==27:
        break

cv2.destroyAllWindows()
Multi Object Tracking based on Color
Skin Isolation
~/cv2/cam_skin_detection.py
~/cv2/jpg_skin_detection.py
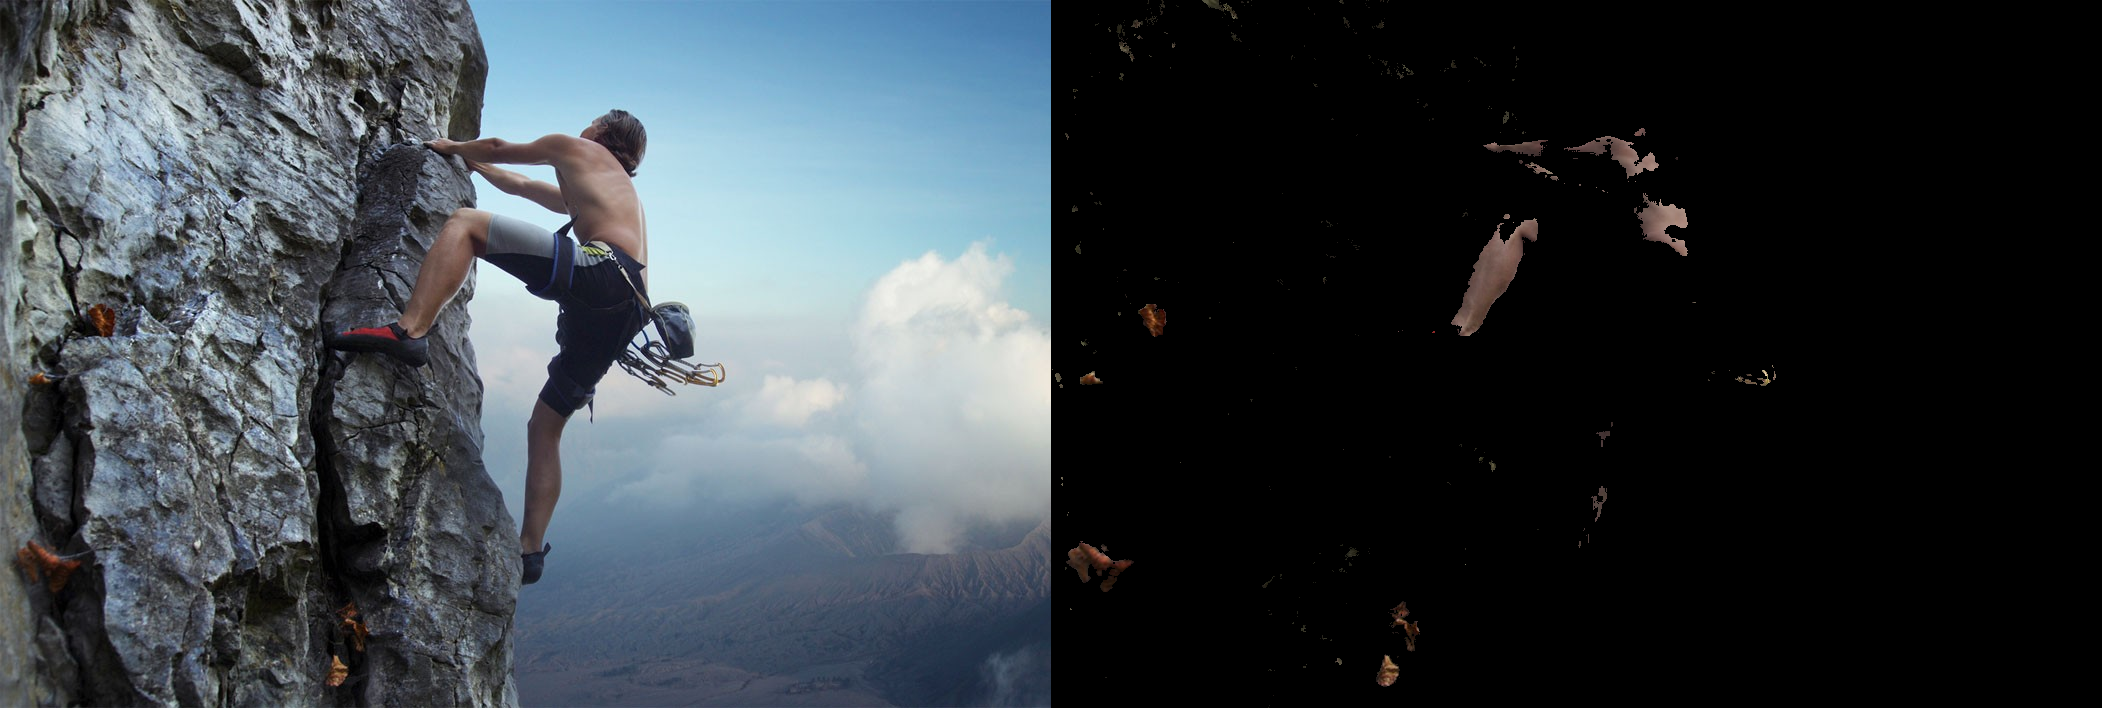
Image Thresholding
- Simple Thresholding: ~/cv2/jpg_image_thresholding.py
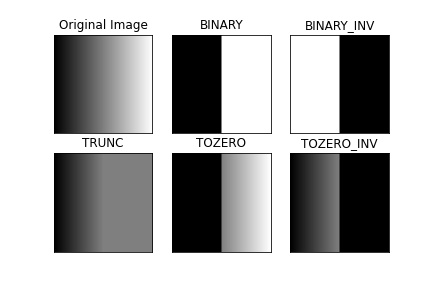
- cv2.THRESH_BINARY
- cv2.THRESH_BINARY_INV
- cv2.THRESH_TRUNC
- cv2.THRESH_TOZERO
- cv2.THRESH_TOZERO_INV
-
Adaptive Thresholding: ~/cv2/jpg_adaptive_thresholding.py
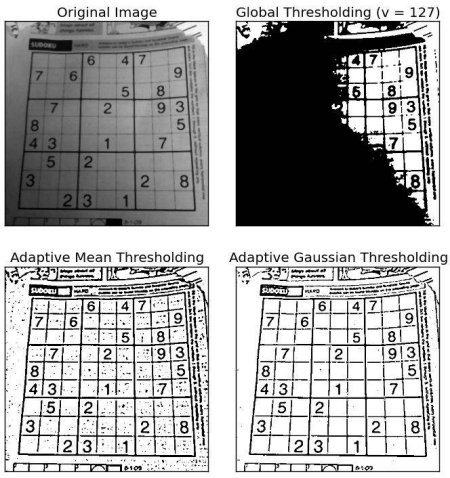
- Otsu’s Binarization: ~/cv2/jpg_otsu_binarization.py
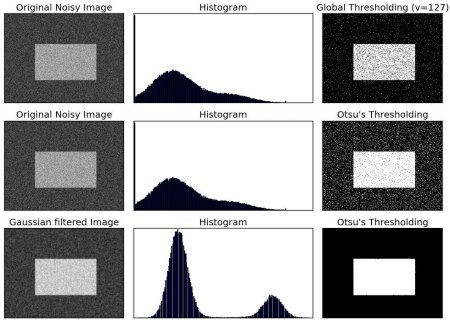
Image Processing Tutorial
Smoothing Images
- blur()
- GaussianBlur()
- medianBlur()
- bilateralFilter()
- filter2D(): jpg_2dfilter.py

Morphological Transformations
- Erosion
- Dilation
- Opening
- Closing
- Morphological Gradient
- Top Hat
- Black Hat

~/cv2/jpg_morphological_transformations.py
import cv2
import numpy as np
from matplotlib import pyplot as plt

img = cv2.imread('j.png',0)
kernel = np.ones((5,5),np.uint8)
erosion = cv2.erode(img,kernel,iterations = 1)
dilation = cv2.dilate(img,kernel,iterations = 1)
opening = cv2.morphologyEx(img, cv2.MORPH_OPEN, kernel)
closing = cv2.morphologyEx(img, cv2.MORPH_CLOSE, kernel)
gradient = cv2.morphologyEx(img, cv2.MORPH_GRADIENT, kernel)
tophat = cv2.morphologyEx(img, cv2.MORPH_TOPHAT, kernel)
blackhat = cv2.morphologyEx(img, cv2.MORPH_BLACKHAT, kernel)

titles = ['Image','Erosion','Dilation','Opening','Closing','Gradient','Tophat','Blackhat']
images = [img, erosion, dilation, opening, closing, gradient, tophat, blackhat]

for i in range(8):
    plt.subplot(2,4,i+1), plt.imshow(images[i],'gray')
    plt.title(titles[i])
    plt.xticks([]),plt.yticks([])
plt.show()
Geometric Transformation
- Scaling (Resize): jpg_resize.py
- Rotation : jpg_rotation.py
- Affine Transform: jpg_affine_transformation.py
- Perspective Transform jpg_perspective_transformation.py


Reference: OpenCV學習筆記】之仿射變換(Affine Transformation)
Image Gradients

import cv2

org = cv2.imread('test.jpg')
gray  = cv2.cvtColor(org, cv2.COLOR_RGB2GRAY)
img   = cv2.GaussianBlur(gray, (3,3), 0) # remove noise

# convolute with proper kernels
laplacian = cv2.Laplacian(img, cv2.CV_64F)
sobel_x = cv2.Sobel(img, cv2.CV_16S, 1, 0, ksize=5)
sobel_y = cv2.Sobel(img, cv2.CV_16S, 0, 1, ksize=5)
cv2.imshow('Laplacian', laplacian)
cv2.imshow('SobelX', sobel_x)
cv2.imshow('SobelY', sobel_y)

abs_grad_x = cv2.convertScaleAbs(sobel_x)
abs_grad_y = cv2.convertScaleAbs(sobel_y)
grad = cv2.addWeighted(abs_grad_x, 0.5, abs_grad_y, 0.5, 0)
cv2.imshow('Sobel', grad)

cv2.waitKey(0)
cv2.destroyAllWindows()
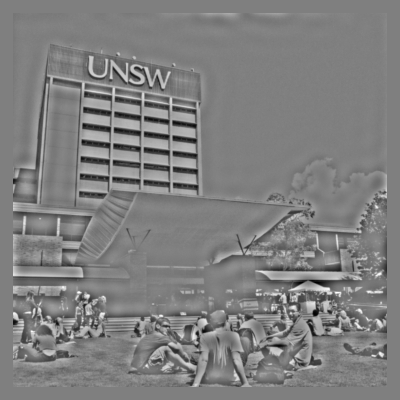
Fourier Transform


- Why Laplacian/Sobel is a High Pass Filter?
 From image, you can see what frequency region each kernel blocks, and what region it passes. From that information, we can say why each kernel is a HPF or a LPF
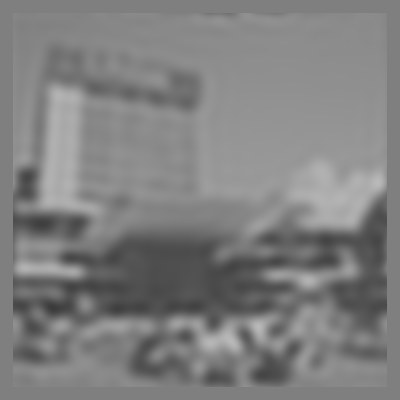
Spatial Frequency Filtering
- UNSW
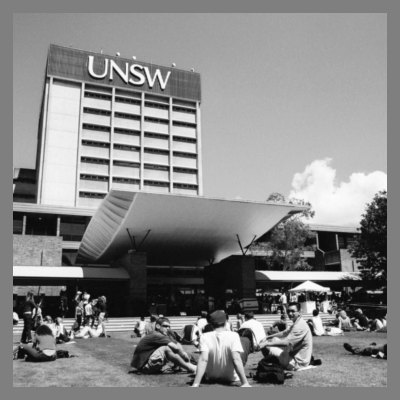
- Converting to frequency space - jpg_spatial_frequency.py
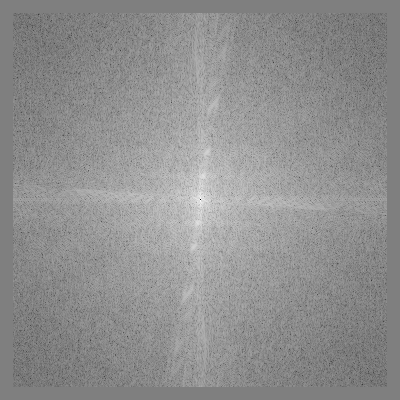
- Creating a spatial frequency filter - jpg_spatial_frequency_filter.py
- Applying a spatial frequency filter - jpg_spatial_frequency_filtering.py
- Converting back to an image - jpg_spatial_frequency_filtered.py
- Other spatial frequency filters
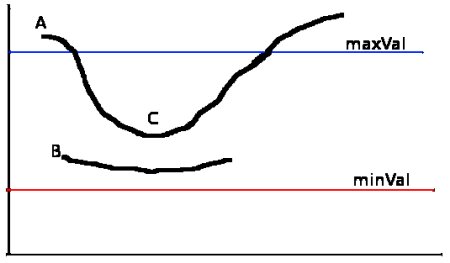
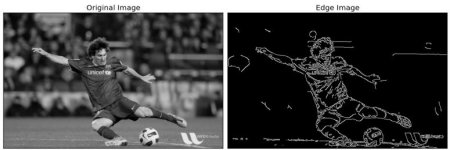
Edge Detection
- Noise Reduction : To remove the noise in the image with a 5x5 Gaussian filter.
- Finding Intensity Gradient of the Image

- Non-maximum Suppression
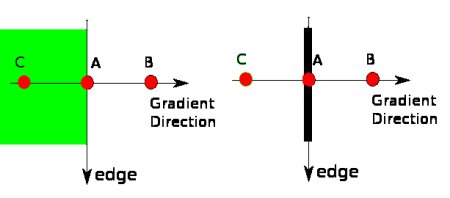
- Hysteresis Thresholding
 邊緣偵測懶人包-Canny演算法
Hough Line Transform
- Hough Lines
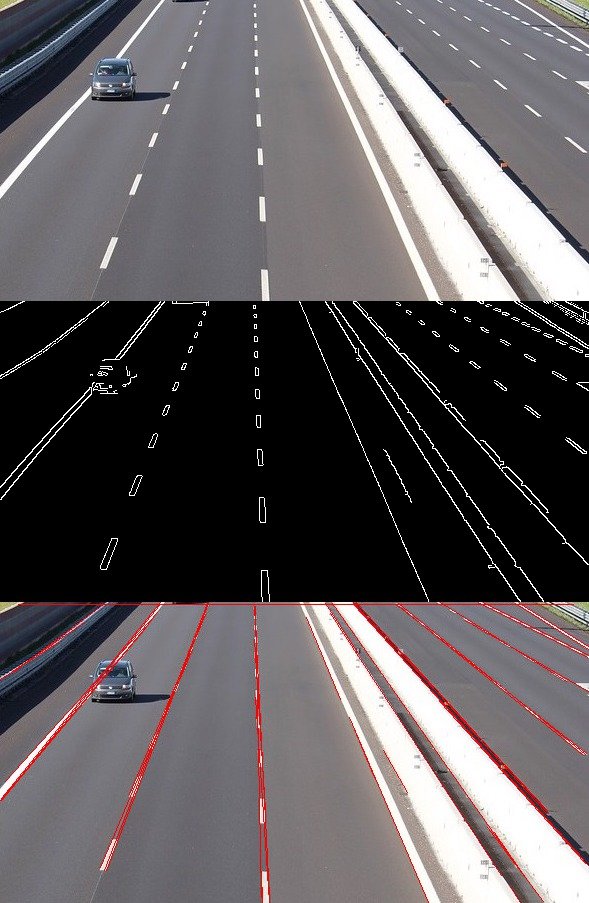 ~/cv2/jpg_houghlines.py
img = cv2.imread('lanes.jpg', cv2.IMREAD_COLOR) # road.png is the filename
gray = cv2.cvtColor(img, cv2.COLOR_BGR2GRAY)
edges = cv2.Canny(gray, 50, 200)
# Detect points that form a line
lines = cv2.HoughLinesP(edges, 1, np.pi/180, max_slider, minLineLength=10, maxLineGap=250)

# Draw lines on the image
for line in lines:
    x1, y1, x2, y2 = line[0]
    cv2.line(img, (x1, y1), (x2, y2), (255, 0, 0), 3)

cv2.imshow("Result Image", img)
- Hough Circles

 ~/cv2/jpg_houghcircles.py
img = cv2.imread('circles.png', cv2.IMREAD_COLOR)
gray = cv2.cvtColor(img, cv2.COLOR_BGR2GRAY)
img_blur = cv2.medianBlur(gray, 5)
circles = cv2.HoughCircles(img_blur, cv2.HOUGH_GRADIENT, 1, img.shape[0]/64, param1=200, param2=10, minRadius=5, maxRadius=30)

# Draw detected circles
if circles is not None:
    circles = np.uint16(np.around(circles))
    for i in circles[0, :]:
        cv2.circle(img, (i[0], i[1]), i[2], (0, 255, 0), 2) # Draw outer circle
        cv2.circle(img, (i[0], i[1]), 2, (0, 0, 255), 3) # Draw inner circle
Image Histogram
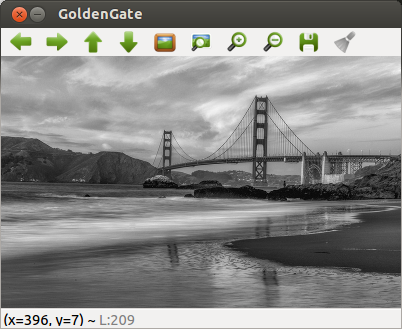
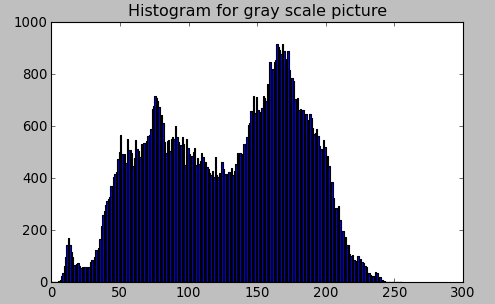
- Gray to Histogram
import cv2
import numpy as np
from matplotlib import pyplot as plt

gray_img = cv2.imread('images/GoldenGateSunset.png', cv2.IMREAD_GRAYSCALE)
cv2.imshow('GoldenGate',gray_img)
hist = cv2.calcHist([gray_img],[0],None,[256],[0,256])
plt.hist(gray_img.ravel(),256,[0,256])
plt.title('Histogram for gray scale picture')
plt.show()
 |
 |
- Color to Histogram
import cv2
import numpy as np
from matplotlib import pyplot as plt

img = cv2.imread('images/GoldenGateSunset.png', -1)
cv2.imshow('GoldenGate',img)

color = ('b','g','r')
for channel,col in enumerate(color):
    histr = cv2.calcHist([img],[channel],None,[256],[0,256])
    plt.plot(histr,color = col)
    plt.xlim([0,256])
plt.title('Histogram for color scale picture')
plt.show()
 |
|
- Histogram Equalization
~/cv2/jpg_histogram_equalization.py
img = cv2.imread('test.jpg')
src = cv2.cvtColor(img, cv2.COLOR_BGR2GRAY)
dst = cv2.equalizeHist(src)
cv2.imshow('Source', src)
cv2.imshow('Equalized', dst)
- Histogram Backprojection
~/cv2/jpg_histogram_backprojection.py
Template Matching
~/cv2/jpg_template_matching.py
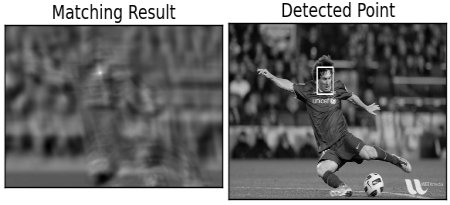
~/cv2/jpg_template_matching_objects.py
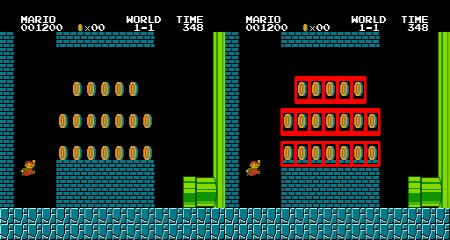
img_rgb = cv.imread('mario.png')
img_gray = cv.cvtColor(img_rgb, cv.COLOR_BGR2GRAY)
template = cv.imread('mario_coin.png',0)
w, h = template.shape[::-1]
res = cv.matchTemplate(img_gray,template,cv.TM_CCOEFF_NORMED)
threshold = 0.8
loc = np.where( res >= threshold)
for pt in zip(*loc[::-1]):
    cv.rectangle(img_rgb, pt, (pt[0] + w, pt[1] + h), (0,0,255), 2)
cv.imwrite('res.png',img_rgb)
Contours
- 求圖像輪廓 cnts, hierarchy = cv2.findContours(thresh, mode, method)
- 畫輪廓 cv2.drawContours(img, cnts, contourIdx, color, lineType)
- 求包覆矩形 (x,y,w,h) = cv2.boundingRect(cnt)
- 求包覆矩形 box = cv2.minAreaRect(cnt)
- 求包覆圓形 ((x,y), radius) = cv2.minEnclosingCircle(cnt)
- 求包覆橢圓形 ellipse = cv2.fitEllipse(cnt)
-
計算輪廓面積 area = cv2.contourArea(cnt)
contours, hierarchy = cv2.findContours(thresh, mode, method)
- img : output image
- contours:包含所有輪廓的容器(vector),每個輪廓都是儲存點的容器(vector),所以contours的資料結構為vector< vector>。
- hierarchy:可有可無的輸出向量,以階層的方式記錄所有輪廓
- thresh:輸入圖,使用八位元單通道圖,所有非零的像素都會列入考慮,通常為二極化後的圖
- mode:取得輪廓的模式
- cv2.RETR_EXTERNAL:只取最外層的輪廓。
- cv2.RETR_LIST:取得所有輪廓,不建立階層(hierarchy)。
- cv2.RETR_CCOMP:取得所有輪廓,儲存成兩層的階層,首階層為物件外圍,第二階層為內部空心部分的輪廓,如果更內部有其餘物件,包含於首階層。
- cv2.RETR_TREE:取得所有輪廓,以全階層的方式儲存。
- method:儲存輪廓點的方法
- cv2.CHAIN_APPROX_NONE:儲存所有輪廓點。
- cv2.CHAIN_APPROX_SIMPLE:對水平、垂直、對角線留下頭尾點,所以假如輪廓為一矩形,只儲存對角的四個頂點。
cv2.drawContours(image, contours, contourIdx, color, lineType)
- image:輸入輸出圖,會將輪廓畫在此影像上
- contours:包含所有輪廓的容器(vector),也就是findContours()所找到的contours
- contourIdx:指定畫某個輪廓 (-1 = all)
- color:繪製的顏色 (0,0,255) in G-B-R
- lineType:繪製的線條型態
- Examples:
Hand Contour

img_path = "hand.jpg"
img = cv.imread(img_path)

# define the upper and lower boundaries of the HSV pixel intensities
# to be considered 'skin'
hsvim = cv.cvtColor(img, cv.COLOR_BGR2HSV)
lower = np.array([0, 48, 80], dtype="uint8")
upper = np.array([20, 255, 255], dtype="uint8")
skinMask= cv.inRange(hsvim, lower, upper)

# blur the mask to help remove noise
skinMask= cv.blur(skinMask, (2, 2))

# get threshold image
ret, thresh = cv.threshold(skinMask, 100, 255, cv.THRESH_BINARY)
cv.imshow("thresh", thresh)

# draw the contours on the empty image
contours, hierarchy = cv.findContours(thresh, cv.RETR_TREE, cv.CHAIN_APPROX_SIMPLE)
contours = max(contours, key=lambda x: cv.contourArea(x))
cv.drawContours(img, [contours], -1, (255, 255, 0), 2)
cv.imshow("contours", img)

cv.waitKey()
Hand Detection and Finger Counting
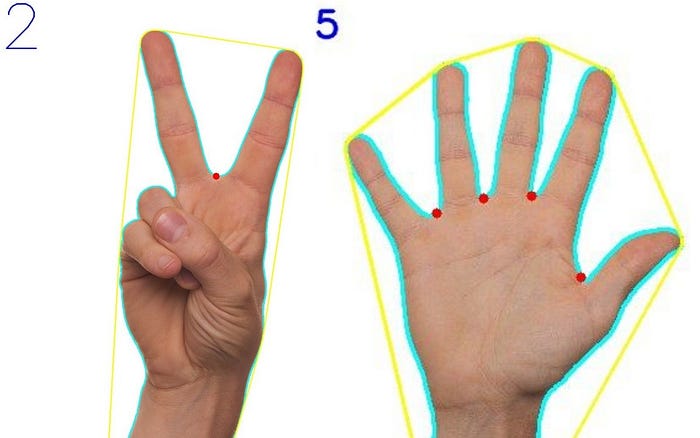
Hand Detection & Gesture Recognition
pip install cvzone
import cvzone
import cv2

cap = cv2.VideoCapture(0)
cap.set(3, 1280)
cap.set(4, 720)
detector = cvzone.HandDetector(detectionCon=0.5, maxHands=1)

while True:
    # Get image frame
    success, img = cap.read()

    # Find the hand and its landmarks
    img = detector.findHands(img)
    lmList, bbox = detector.findPosition(img)

    # Display
    cv2.imshow("Image", img)
    cv2.waitKey(1)
Image Segmentation with Watershed Algorithm
~/cv2/jpg_image_segmentation.py
import numpy as np
import cv2 as cv
from matplotlib import pyplot as plt

img = cv.imread('coins.png')
gray = cv.cvtColor(img,cv.COLOR_BGR2GRAY)
ret, thresh = cv.threshold(gray,0,255,cv.THRESH_BINARY_INV+cv.THRESH_OTSU)

# noise removal
kernel = np.ones((3,3),np.uint8)
opening = cv.morphologyEx(thresh,cv.MORPH_OPEN,kernel, iterations = 2)
# sure background area
sure_bg = cv.dilate(opening,kernel,iterations=3)
# Finding sure foreground area
dist_transform = cv.distanceTransform(opening,cv.DIST_L2,5)
ret, sure_fg = cv.threshold(dist_transform,0.7*dist_transform.max(),255,0)
# Finding unknown region
sure_fg = np.uint8(sure_fg)
unknown = cv.subtract(sure_bg,sure_fg)

# Marker labelling
ret, markers = cv.connectedComponents(sure_fg)
# Add one to all labels so that sure background is not 0, but 1
markers = markers+1
# Now, mark the region of unknown with zero
markers[unknown==255] = 0

markers = cv.watershed(img,markers)
img[markers == -1] = [255,0,0]

Foreground Extraction
Blog: OpenCV GrabCut: Foreground Segmentation and Extraction
grabCut(img, mask, rect, bgdModel, fgdModel, iterCount, mode)
- img:輸入圖,8位元3通道
- mask :輸出圖,8位元單通道圖。每個像素為以下四個標誌之一:
- GC_BGD:確定是背景
- GC_ FGD :確定是前景
- GC_PR_BGD:可能是背景
- GC_PR_ FGD :可能是前景
- rect :輸入矩形,在這之外的像素全都是背景,只有mode參數是GC_INIT_WITH_RECT時才有效
- bgdModel:背景模型,供演算法內部使用,基本上可以忽略
- fgdModel:前景模型,供演算法內部使用,基本上可以忽略
- iterCount:迭代次數
- mode:處理模式
- GC_INIT_WITH_RECT:提供矩形範圍的初始條件。
- GC_INIT_WITH_MASK:提供遮罩,可和GC_INIT_WITH_RECT共同使用,在這ROI之外的為背景。
- GC_EVAL:預設模式

using new mask to have a clean image
# newmask is the mask image I manually labelled
newmask = cv.imread('newmask.png',0)
# wherever it is marked white (sure foreground), change mask=1
# wherever it is marked black (sure background), change mask=0
mask[newmask == 0] = 0
mask[newmask == 255] = 1
mask, bgdModel, fgdModel = cv.grabCut(img,mask,None,bgdModel,fgdModel,5,cv.GC_INIT_WITH_MASK)
mask = np.where((mask==2)|(mask==0),0,1).astype('uint8')
img = img*mask[:,:,np.newaxis]
plt.imshow(img),plt.colorbar(),plt.show()

Graph Segmentation


Color Matching
~/cv2/color_matching_histogram.py
~/cv2/color_matching_meanstddev.py

Face Detection using Cascade Classifier

if len(sys.argv)>1:
    img = cv2.imread(sys.argv[1])
else:
    img = cv2.imread("friends.jpg")
gray = cv2.cvtColor(img, cv2.COLOR_BGR2GRAY)
face = cv2.CascadeClassifier('haarcascade_frontalface_default.xml')
bboxes = face.detectMultiScale(gray)

for box in bboxes:
    print(box)
    (x,y,w,h) = tuple(box)
    img = cv2.rectangle(img,(x,y),(x+w,y+h),(255,0,0),2)

cv2.imshow('img',img)
Face Recognizer
-
EigenFaces Face Recognizer

-
FisherFaces Face Recognizer

-
Local Binary Patterns Histograms (LBPH) Face Recognizer


LBPH Face Recognition
git clone https://github.com/informramiz/opencv-face-recognition-pythoncd opencv-face-recognition-pythonpython3 OpenCV-Face-Recognition-Python.py

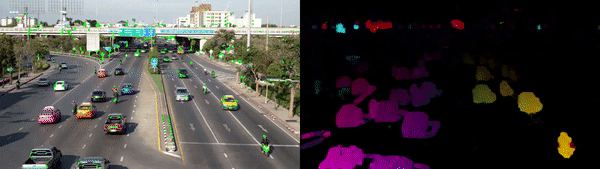
Object Tracking
Tracker: csrt, kcf, boosting, mil, tld, medianflow, mosse
- csrt for slower FPS, higher object tracking accuracy
- kcf for faster FPS, lower object tracking accuracy
- mosse for fastest FPS
Tracking multiple objects with OpenCV
~/cv2/multi_object_tracking.py
Optical Flow
Introduction to Motion Estimation with Optical Flow
What is optical flow?
The problem of optical flow may be expressed as:
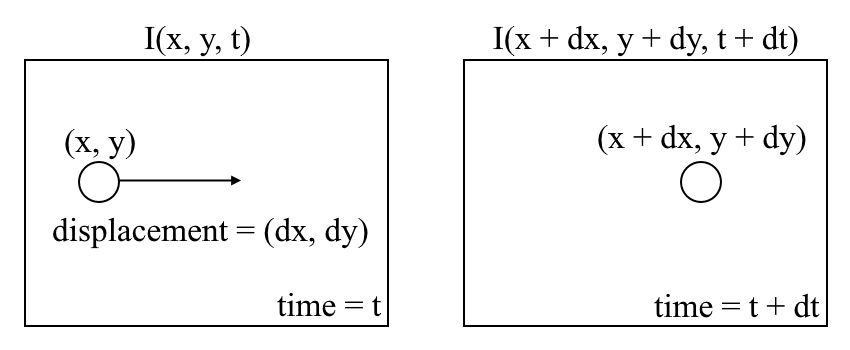 where between consecutive frames, we can express the image intensity (I) as a function of space (x,y) and time (t).
- First, we assume that pixel intensities of an object are constant between consecutive frames.

- Second, we take the Taylor Series Approximation of the RHS and remove common terms.

- Third, we divide by dt to derive the optical flow equation:
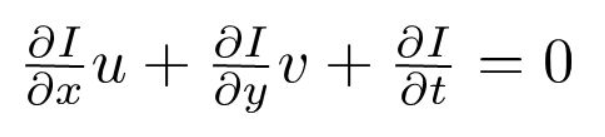 where u = dx/dt, v = dy/dt
To track the motion of vehicles across frames
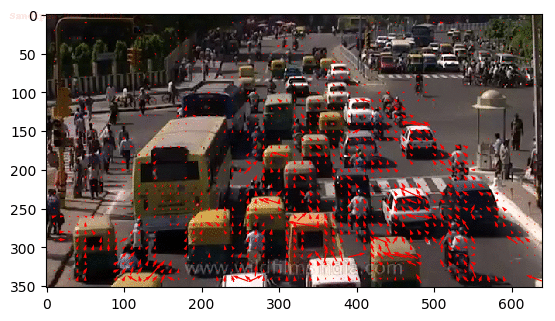
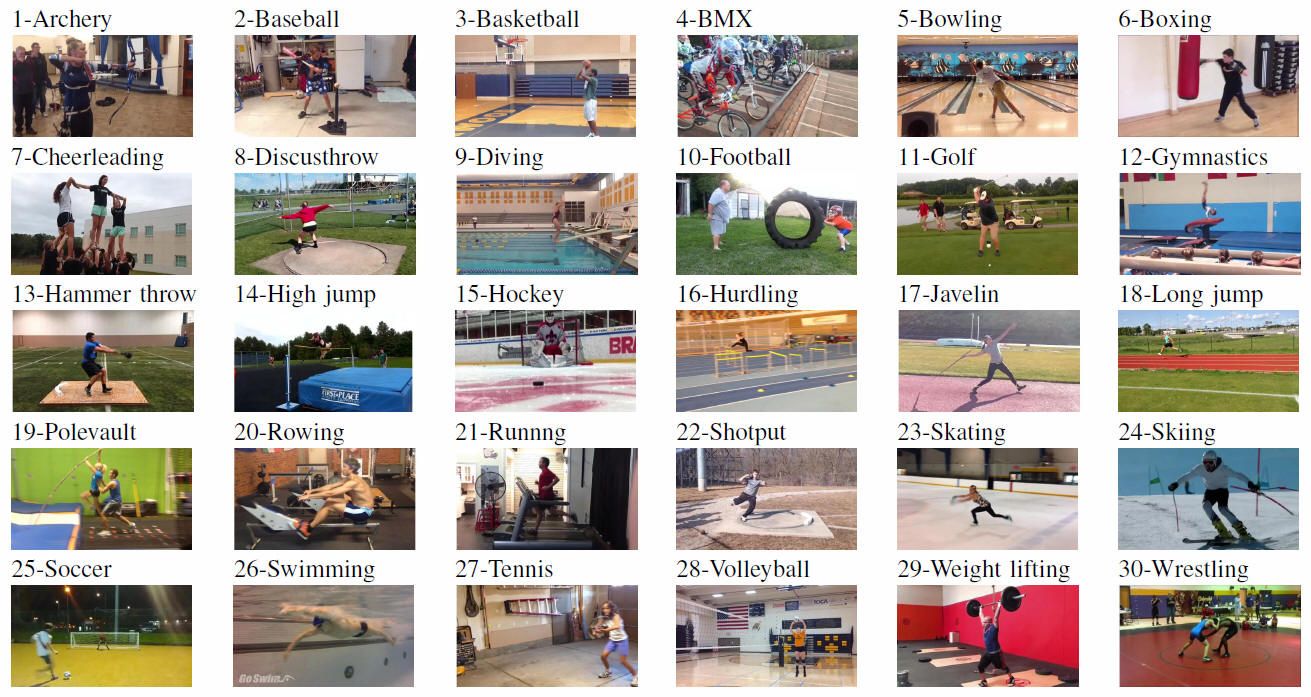
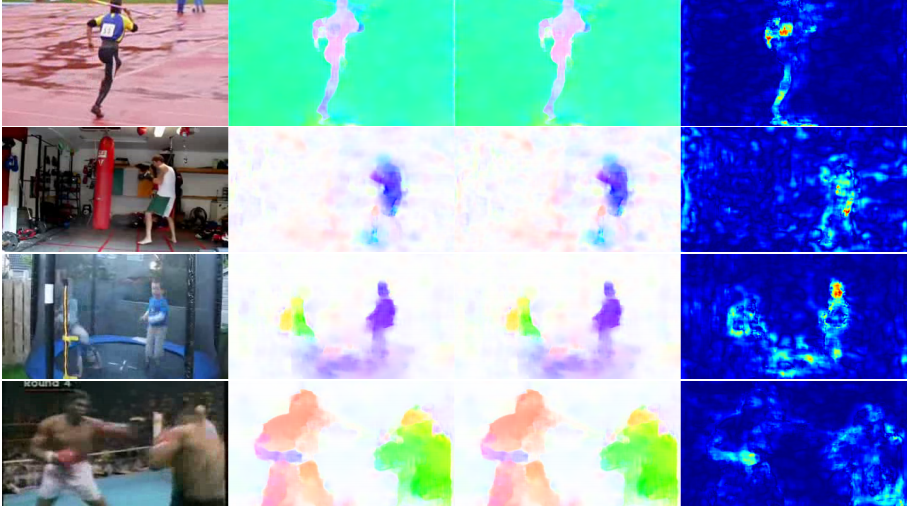
To recognize human actions (such as archery, baseball, and basketball)
Applications
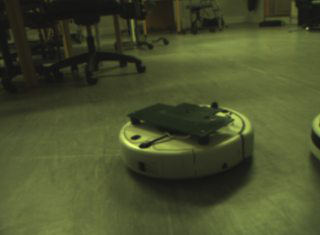
Motion Detector
Basic motion detection and tracking with Python and OpenCV
~/cv2/cam_motion_detection.py

Webcam Pulse Detector
git clone https://github.com/thearn/webcam-pulse-detector
cd webcam-pulse-detector
python get_pulse.py
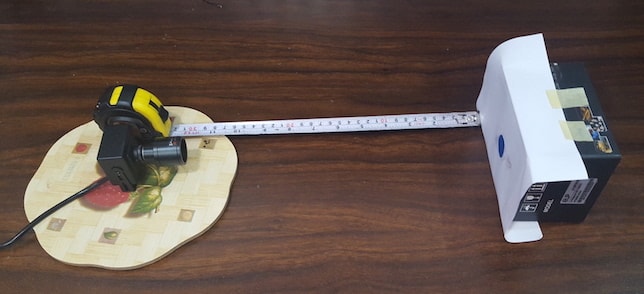
Distance Measurement
Blog: Real-time Distance Measurement Using Single Image

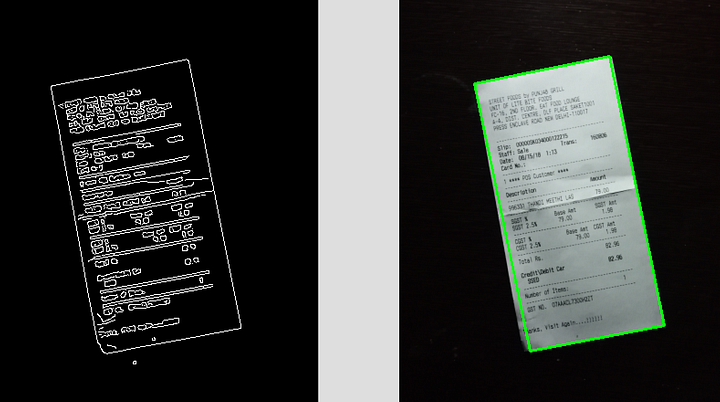
OCR (Optical Character Recognition)
- Tesseract OCR
- Tesseract Documentation
- Tesseract installers for Windows
Blog: Open OCR and text recognition with Tesseract


Blog: Improve Accuracy of OCR using Image Preprocessing
Scaling Image
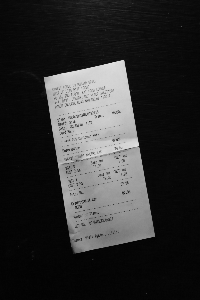
Skew Correction
QR Scanner
- 安裝函式庫
pip install pyzbar - QR code 產生器:~/cv2/qr_gen.html
- ~/cv2/qr_scan.py
python qr_scan.py -i qr_csu.jpg
Poker Card Detector
Automatic License Plate Recognition (車牌辨識)
OpenCV: Automatic License/Number Plate Recognition (ANPR) with Python
![]()
樂譜辨識
cadenCV is an optical music recognition system written in the Python programming language which reads sheet music and sequences a MIDI file for user playback.

git clone https://github.com/afikanyati/cadenCV
cd cadenCV
rm output/*
pip install midiutil
python main.py resources/samples/mary.jpg
Output: .jpg & .midi
- html-midi player : upload output.mid & play

撿乒乓球機器人

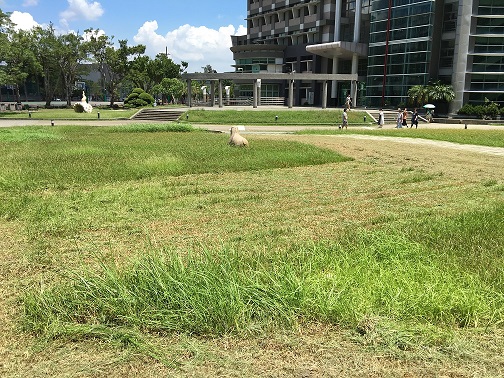
割草機器人
高爾夫球機器人

垃圾桶機器人
四軸無人機

起降點與號誌
 |
 |
 |
 |
 |
 |
-
物件偵測 (起降點)
~/cv2/copter/jpg_object_detect.py
~/cv2/copter/cam_object_detect.py -
光流偵測 (懸停)
~/cv2/copter/cam_optical_flow_sparse.py
This site was last updated June 21, 2024.